Serial Communication in Java with Example Program
This post is recreated from the original at https://blog.henrypoon.com/blog/2011/01/01/serial-communication-in-java-with-example-program/
This is a follow-up to my previous posts about serial programming in Java (Java Serial Programming) and how to install the RXTX libraries (Installing RXTX for Serial Communication with Java). This post assumes that Java is already properly set up with RXTX.
Generally, communication with serial ports involves these steps:
- Searching for serial ports
- Connecting to the serial port
- Starting the input output streams
- Adding an event listener to listen for incoming data
- Disconnecting from the serial port
- Sending Data
- Receiving Data
I wrote an example program that includes all of those steps in it and are each in their own separate method within the class.
Hardware Setup
My current hardware setup is as follows:
- PC connected to an XBee
- Arduino connected to an XBee
User input is given from the PC through a Java GUI that contains code for serial communication. The Arduino is responsible for reading this data. This set up is pretty much using my computer as a remote control for whatever device is on the Arduino end. It could be a motor control, on-off switch, etc.
The GUI
The purpose of this post is to discuss serial programming in Java, and not GUIs. However, I did create a GUI for testing purposes.
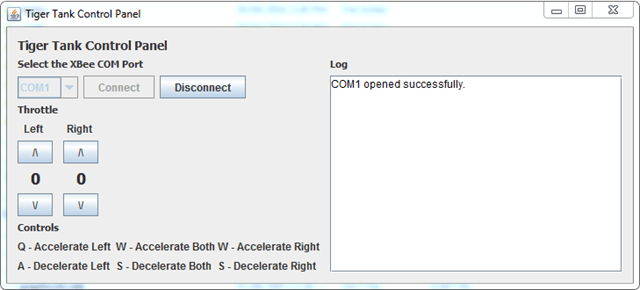
Above is the picture of the GUI complete with the buttons that I use to interact with the program. I also added key bindings which I can use to control the throttle.
When the program is first started, none of the GUI elements will work except for the combo box and the connect button. Once a successful connection is made the controls are enabled.
Imports
1
2
3
4
5
6
7
8
import gnu.io.*;
import java.awt.Color;
import java.io.IOException;
import java.io.InputStream;
import java.io.OutputStream;
import java.util.Enumeration;
import java.util.HashMap;
import java.util.TooManyListenersException;
Class Declaration
1
public class Communicator implements SerialPortEventListener
The class should also implement the SerialPortEventListener class. This is a class in RXTX and is required in order to receive incoming data.
Searching for Available Serial Ports
1
2
3
4
5
6
7
8
9
10
11
12
13
14
15
16
void searchForPorts()
{
    ports = CommPortIdentifier.getPortIdentifiers();

    while (ports.hasMoreElements())
    {
        CommPortIdentifier curPort = (CommPortIdentifier)ports.nextElement();

        //get only serial ports
        if (curPort.getPortType() == CommPortIdentifier.PORT_SERIAL)
        {
            window.cboxPorts.addItem(curPort.getName());
            portMap.put(curPort.getName(), curPort);
        }
    }
}
Connecting to the Serial Port
1
2
3
4
5
6
7
8
9
10
11
12
13
14
15
16
17
18
19
20
21
22
23
24
25
26
27
28
29
30
31
32
33
34
35
public void connect()
{
    String selectedPort = (String)window.cboxPorts.getSelectedItem();
    selectedPortIdentifier = (CommPortIdentifier)portMap.get(selectedPort);

    CommPort commPort = null;

    try
    {
        commPort = selectedPortIdentifier.open("TigerControlPanel", TIMEOUT);
        serialPort = (SerialPort)commPort;

        setConnected(true);

        logText = selectedPort + " opened successfully.";
        window.txtLog.setForeground(Color.black);
        window.txtLog.append(logText + "\n");

        //enables the controls on the GUI if a successful connection is made
        window.keybindingController.toggleControls();
    }
    catch (PortInUseException e)
    {
        logText = selectedPort + " is in use. (" + e.toString() + ")";

        window.txtLog.setForeground(Color.RED);
        window.txtLog.append(logText + "\n");
    }
    catch (Exception e)
    {
        logText = "Failed to open " + selectedPort + "(" + e.toString() + ")";
        window.txtLog.append(logText + "\n");
        window.txtLog.setForeground(Color.RED);
    }
}
Initializing the Input and Output Streams
1
2
3
4
5
6
7
8
9
10
11
12
13
14
15
16
17
18
19
public boolean initIOStream()
{
    boolean successful = false;

    try {
        input = serialPort.getInputStream();
        output = serialPort.getOutputStream();
        writeData(0, 0);

        successful = true;
        return successful;
    }
    catch (IOException e) {
        logText = "I/O Streams failed to open. (" + e.toString() + ")";
        window.txtLog.setForeground(Color.red);
        window.txtLog.append(logText + "\n");
        return successful;
    }
}
Setting Up Event Listeners
1
2
3
4
5
6
7
8
9
10
11
12
13
14
public void initListener()
{
    try
    {
        serialPort.addEventListener(this);
        serialPort.notifyOnDataAvailable(true);
    }
    catch (TooManyListenersException e)
    {
        logText = "Too many listeners. (" + e.toString() + ")";
        window.txtLog.setForeground(Color.red);
        window.txtLog.append(logText + "\n");
    }
}
Disconnecting from the Serial Port
1
2
3
4
5
6
7
8
9
10
11
12
13
14
15
16
17
18
19
20
21
22
23
24
25
public void disconnect()
{
    try
    {
        writeData(0, 0);

        serialPort.removeEventListener();
        serialPort.close();
        input.close();
        output.close();
        setConnected(false);
        window.keybindingController.toggleControls();

        logText = "Disconnected.";
        window.txtLog.setForeground(Color.red);
        window.txtLog.append(logText + "\n");
    }
    catch (Exception e)
    {
        logText = "Failed to close " + serialPort.getName()
                          + "(" + e.toString() + ")";
        window.txtLog.setForeground(Color.red);
        window.txtLog.append(logText + "\n");
    }
}
Reading Data - The serialEvent Method
1
2
3
4
5
6
7
8
9
10
11
12
13
14
15
16
17
18
19
20
21
22
23
24
25
public void serialEvent(SerialPortEvent evt) {
    if (evt.getEventType() == SerialPortEvent.DATA_AVAILABLE)
    {
        try
        {
            byte singleData = (byte)input.read();

            if (singleData != NEW_LINE_ASCII)
            {
                logText = new String(new byte[] {singleData});
                window.txtLog.append(logText);
            }
            else
            {
                window.txtLog.append("\n");
            }
        }
        catch (Exception e)
        {
            logText = "Failed to read data. (" + e.toString() + ")";
            window.txtLog.setForeground(Color.red);
            window.txtLog.append(logText + "\n");
        }
    }
}
Writing Data
1
2
3
4
5
6
7
8
9
10
11
12
13
14
15
16
17
18
19
20
21
public void writeData(int leftThrottle, int rightThrottle)
{
    try
    {
        output.write(leftThrottle);
        output.flush();
        output.write(DASH_ASCII);
        output.flush();

        output.write(rightThrottle);
        output.flush();
        output.write(SPACE_ASCII);
        output.flush();
    }
    catch (Exception e)
    {
        logText = "Failed to write data. (" + e.toString() + ")";
        window.txtLog.setForeground(Color.red);
        window.txtLog.append(logText + "\n");
    }
}
Arduino Code
1
2
3
4
5
6
7
8
9
10
11
12
13
14
15
16
17
18
19
20
21
22
23
24
int left = 0;
int right = 0;
byte space = 0;
byte separator = 0;

void setup(){
  Serial.begin(9600);
}

void loop(){
  if (Serial.available() >= 4){
    left = Serial.read();
    separator = Serial.read();
    right = Serial.read();
    space = Serial.read();
    Serial.flush();

    Serial.print(left);
    Serial.write(byte(separator));
    Serial.print(right);
    Serial.write(byte(space));
    Serial.print("\n");
  }
}
Note: The syntax for writing bytes in Arduino has changed since this article was written. The lines:
1
2
Serial.print(separator, BYTE);
Serial.print(space, BYTE);
Should now be:
1
2
Serial.write(byte(separator));
Serial.write(byte(space));
Code Downloads
The complete source code for the GUI, key bindings and serial communication is available for download: Download from MediaFire
Reference Material